Next: Sparse Matrices
Contents
Traditionally, partial difference equation based (PDE-based) methods, (for example, the Finite Difference Time Domain (FDTD) and the Finite Element (FEM) methods), have had difficulties dealing with open region problems. In these methods, the computational domain has to be truncated to keep the computational resource requirements reasonable.
A number of methods have been proposed to deal with the boundary truncation in FEM. One of them, based on the one-way wave equation, is called the Engquist-Majda absorbing boundary conditions (ABCs) [12]. Researchers have also combined FEM with the Method of Moments (MOM) to come up with a hybrid modeling scheme [6]. In these hybrid methods, FEM is applied inside the volume of interest and MOM is applied on the surface. Finite thickness absorbing layers have also been investigated. Recently, Berenger [13] introduced a novel and efficient method, called the Perfectly Matched Layer method. This provides a reflectionless interface between the region of interest and the PML layers at all incident angles. The layers themselves are lossy, so that after a few layers the wave is significantly attenuated. Berenger formulated the PMLs for use in FDTD. Sacks and other researchers [5] adapted the PML concept to FEM. The formulation in Sacks et al. is the basis of the PML employed by EMAP4.
The advantage of using PMLs is that the PML layer obeys Maxwell's equations. Maxwell's equations are written as follows for the PML region.
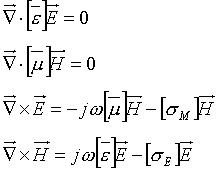 (15)
(15)
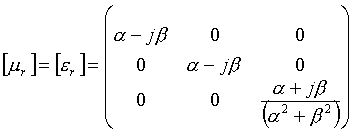
where [m ] and [e ] are the effective permeability and permittivity of the PML region and can be represented as follows.
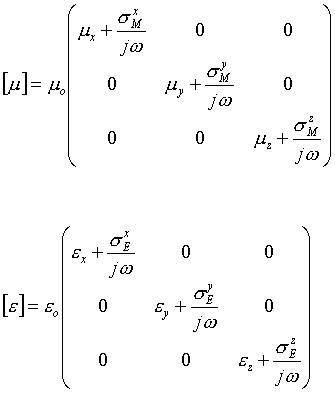 (16)
(16)
This type of a medium is called a diagonal anisotropic medium. Now let a plane wave be incident on the boundary between free space and this PML layer as shown in Figure 16.
For convenience let us choose the tensors as follows.
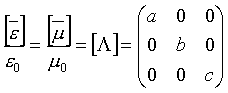 (17)
(17)
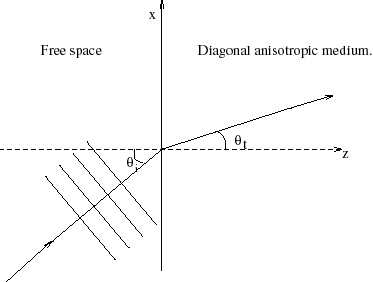
Figure 16: Reflection of a plane wave between
free space and a diagonally anisotropic
medium.
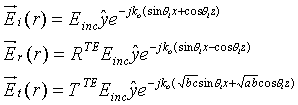
A plane wave incident on the interface can be decomposed into TE and TM modes. Let us consider TE modes first. For the direction of propagation as shown in the figure, the incident, reflected and transmitted fields can be derived as follows.
 (18)
(18)
where RTE and TTE are the reflection
and transmission coefficients respectively. For this interface,
the following properties hold true.
The electric field continuity implies
![]() . (19)
. (19)
Phase continuity implies
![]() (20)
(20)
and continuity of the x-component of the magnetic field leads to
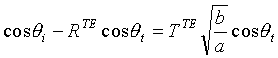 . (21)
 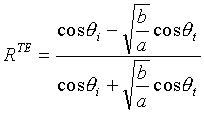 . (22)
 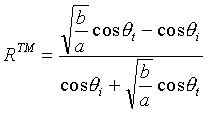 . (23)
 . (24)
 This section illustrates the use of the PML in 1-D using an example. The example used here is shown in Figure 17. The setup is a rectangular waveguide, which is terminated in the PML layer at one end (the PML is backed by a conducting wall). It is driven in the TE10 mode at the other end. The waveguide is filled with a lossless dielectric. The input file for this example is given below:
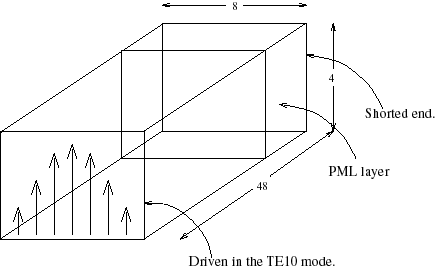
Figure 17:Waveguide driven in the TE10 mode
and terminated in a PML
# Waveguide driven in TE10 mode
# The waveguide is terminated in a PML
# The PML is backed by an electric wall
celldim 1 cm
box 0 0 0 8 4 48
PML 0 0 36 8 4 48 z 1.0 1.0
esource 7 0 0 8 4 0 1910 y 0.1951 0
esource 6 0 0 7 4 0 1910 y 0.5556 0
esource 5 0 0 6 4 0 1910 y 0.8315 0
esource 4 0 0 5 4 0 1910 y 0.9808 0
esource 3 0 0 4 4 0 1910 y 0.9808 0
esource 2 0 0 3 4 0 1910 y 0.8315 0
esource 1 0 0 2 4 0 1910 y 0.5556 0
esource 0 0 0 1 4 0 1910 y 0.1951
0
esource 8 0 0 8 4 0 1910 y 0.0000 0
esource 7 0 0 7 4 0 1910 y 0.3830 0
esource 6 0 0 6 4 0 1910 y 0.7070 0
esource 5 0 0 5 4 0 1910 y 0.9240 0
esource 4 0 0 4 4 0 1910 y 1.0000 0
esource 3 0 0 3 4 0 1910 y 0.9240 0
esource 2 0 0 2 4 0 1910 y 0.7070 0
esource 1 0 0 1 4 0 1910 y 0.3830 0
esource 0 0 0 0 4 0 1910 y 0.0000 0
efield_output 0 2 0 8 2 48 example.out
The input file is explained as follows. The celldim statement sets the size of the mesh to be 1 cm in all cells in all directions. This is about 15 cells per wavelength. The box statement sets the four sidewalls and the back wall to be conductors. It also sets the front wall to be conducting but is overwritten by the esource statements. The PML statement contains information about the position of the PML and its properties. The esource statements are required to generate a TE10 mode (see Section 3). The efield_output statements output the values of the electric field along an axis of the waveguide. As seen in the input file, the waveguide is 36 cm long and the PML layer is 12 cm long (this is varied). The waveguide is about 2l long, while the PML layer is about 0.75l long. The length of the PML is varied in this study, but the length of the non-PML part remains constant.
In this example, different aspects of the PML layers were studied.
The effect of the number of PML layers on the reflection. The results are given in Figure 18. It is seen that the reflection is reduced as the number of layers increases.
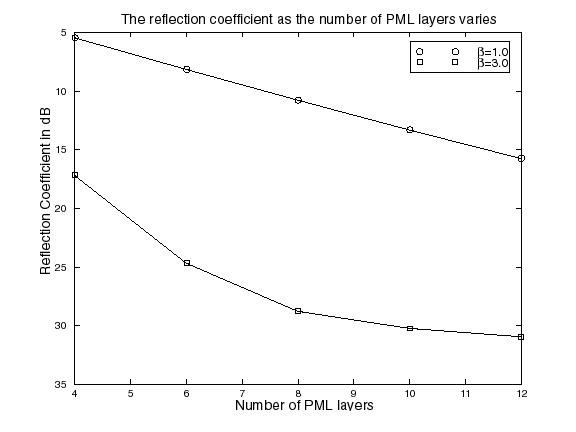
Figure 18: The reflection coefficient as a
function of the number of
layers.
Effect of the values of a and b on the reflection.
The results are given in Figure 19. As seen in the figure, the reflection coefficient first decreases as b increases, reaches a minimum and then increases again. The performance improves when a is set equal to b.

Figure 19: The reflection coefficient as
a and b
change.
Number of iterations required for convergence.
The code uses the Complex Bi-conjugate method to solve the final matrix. So the question arises, "how do the values of a and b affect the rate of convergence (condition number) of the algorithm?". Figure 20 addresses this question. It is observed that higher values of a and b degrade the convergence rate. These results are explained in the following section.

Figure 20: The number of iterations required
for convergence.
In this section, perfectly matched layers (PMLs) have been applied to the finite element method (FEM). A simple waveguide example has been used to study the PML in 1-D.
For the application of the PMLs discussed in Section 2, the EMAP-4 code had to be modified so that it could handle anisotropic dielectrics. This can be done by changing the entries of the local matrix of the element that contains the anisotropic dielectric. This preserves the sparsity of the FEM matrix, which is a major advantage of using FEM.
While solving 3-D problems, the main concern is the resources required. Suppose we have discretized a region of interest into 10 ´ 10 ´ 10. This corresponds to 1000 hexahedra, 5000 tetrahedra and nearly 10,000 unknowns. If we were to apply PMLs to this problem (say 5 layers in each direction), we would add an additional 30,000 unknowns, increasing the number of unknowns by 300%. In general, the increase would be 4-8 times the original number. Inspite of these memory disadvantages, PMLs can be used successfully in a variety of problems.
For the example studied in this report, the number of unknowns was 7500. Since the matrix is sparse, a sparse matrix solver could be used. If the same problem had been solved by a hybrid FEM-MOM method, the matrix size would have been (200 ´ 200 + 5500 ´ 13). This implies that the PMLs require less memory than the hybrid method.
The PMLs work very well for the simple waveguide example studied here. The reflection at the interface decreases as the number of layers increases. This is to be expected as there is more absorption because there are more layers and also that the metal backing plays a lesser role in the total reflection.
The values of a and b have optimum values for the best performance. There are two factors affecting this optimum value. Firstly, the magnitude of the electric field at the metal backing plays a role, the lesser the magnitude, lesser the reflection. This implies we need large b. Secondly, if b is large, the fall in the electric field might be more than what the discretization can handle. This leads to spurious reflections. The optimum a and b occur when there is a compromise between these two factors, i.e., the decay takes place over the entire PML.
Finally, the matrix condition number degrades as the values of b increase. This is because some entries in the final matrix become much larger than the other entries in the matrix. This leads to a higher number of iterations for convergence. The condition number can be improved by setting a = b (this leads to the values of the matrix elements being closer to each other). The value of a = b = 2.5 seems the best for this example.